Showing posts with label entertaining. Show all posts

Friday, November 2, 2007

Dearest Poodleful, Regards, Emily Post


Poodleful believes that the basic rules of entertaining in the '00s have not changed significantly in many years.

However, through the many guests she has had over for dinner, she has some modern advice for fellow hosts and hostesses.

1. One of Poodleful's favorite tips is: Have the guests over AFTER the little darlings are in bed. Poodleful has entertained both ways, with children awake and with children asleep and has discovered that the evening is much more enjoyable for everyone if the two year old is getting her forty winks. Poodleful usually asks guests to arrive for dinner shortly after 8 PM.

2. An entree and a dessert are sufficient for guests. Poodleful and her husband have experimented with the number of courses many times. Some poor guests have suffered through six or seven courses at her earnest but misguided hand. If you must, Poodleful feels like a simple salad, served either before or after the entree is allowable.


3. If you are the guest, please be sure to take something to your hostess. While Poodleful thinks fresh flowers are nicest, if you know that your host and hostess drink, a bottle of wine is also very nice (try to by something original--not expensive but not the cheapest most obvious selection either).


4. Seating arrangements: Traditionally, it goes man-woman-man-woman. But, Poodleful likes to mix things up sometimes, and just to be original, sit woman-woman-man-man, or any other variety. Poodleful feels as if the traditional arrangement is slightly stuffy and kind of awkward at times. And the most important thing about etiquette is that it is supposed to make others as comfortable as possible.

5. Avoid the following foods unless you know your guests fairly well: beets, turnips, shellfish, veal, foie gras, pate, mincemeat pie (Poodleful just included mincemeat pie on the list because she has always HATED it), mushrooms, lots of hot red pepper flakes and any other foods that are not popular with more or less everyone. While you cannot satisfy everyone's palate, there is nothing worse than watching guests fake love for your offerings because they feel as if they have to.
This comes from Poodleful's concrete experience.

6. Lock your dogs (except for Poodleful) in the bathroom close to the time that your guests are scheduled to arrive. Not everyone loves Fluffy as much as you do. (Although everyone loves Poodleful, seriously.)

7. This may seem obvious, but if you are the guest, than MAKE sure that you compliment the chef on their food, whether or not you like it. There is nothing more disappointing than receiving pointers and criticisms about a meal that you have lovingly prepared for a guest. (Poodleful does not mind criticism if she is close personal friends to the guest, this is mostly applicable to fairly formal circumstances.)

Thursday, November 1, 2007

A Pepto-Bismol Birthday Bash!


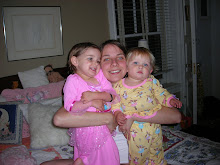
Well, no actual pepto-bismol was involved. But, Poodleful decided that the best way to celebrate Margaret (3) and Portia's (1) respective birthdays was by throwing a large combination birthday party that had a "pink" theme. Overall, I felt that the party was wildly successful.

First, I drew up a guest list. I totally ignored the advice often given for children's birthday party guest lists--invite as many children as your child is turning. Here that would have been four guests (3+1). I invited fifteen children and all of their parents, and even some of our friends who are childless, and my whole family came from out of town.

Second, I arranged the entertainment. Margaret really adores puppet shows, so I secured a puppeteer to come to the party and give a performance. The other main attraction was the cotton candy machine that we rented. They are very easy to use, although not very nice looking.


Third, party decorations were fairly elaborate. I made tissue paper pom poms that hung at different lengths above the party table. I made pennant flags from a variety of pink fabrics that I purchased at Hancock Fabrics. My mother and I made crepe paper roses. We purchased piles of pink candy, and created paper flower/candy bouquets to adorn the table. We dressed the table with a pink crushed velvet piece of fabric trussed with reems of pink ribbons. Directions for the pom poms and pennants follow. Finally, we served some light food items--Matt's famous quesadillas; a bowl full of strawberries, pomegranate seeds and balsamic vinegar; french bread and goat cheese; a barbie birthday cake and a chocolate tart (inspiring my mad tart trend described in my October 30th post); kir royales for the grownups and a pitcher-ful of shirley temples and pink lemonade for the kids.


TISSUE PAPER POM POMS
supplies: tissue paper, scissors, ribbon, pipe cleaners, stapler

1. Procure several different colors of tissue paper. Each pom pom requires 6 sheets.

2. Take six sheets of tissue paper, and fold them accordian style. Tie center with pipe cleaner. Holding the accordian closed, as if it was one narrow strip, cut off the ends into either round or pointed shapes.

3. Release the strip, and pull the tissue paper sheets apart on either side, forming a puffy ball.

4. Attach string to pipe cleaner in the middle and hang pom poms from the ceiling on different length strings.

I used many shades of pink and orange, and they looked very pretty.

Pink Pennant Banners
supplies: several different patterned fabrics, pink bias tape, newspaper, ruler, sewing machine.

1. Create a pennant flag pattern. (This is very easy--just use a ruler to draw an isosceles triangle on a piece of newspaper.

2. Fold your pieces of fabric in half and pinning the pattern to the folded pieces of fabric, cut out many pennant shapes. (For each pennant, I would recommend around 14.)Remember that you want each pennant shape to have two pieces, hence the folding in half. Once you get going, this part takes no time at all.

3. Take the two pieces of fabric and turn them so that the back of the fabric is facing outwards. Use sewing machine to sew a running stitch down the two long sides of the isosceles, leaving the short third side open.

4. Once you have completed sewing all pennants, turn them right side out, and iron. I used a pencil to really push the bottoms of the pennants into points.

5. Use straight pins to pin the pennants, one after another, to the middle of the bias tape. Once all pennants are pinned, sew a running stitch down the middle of the bias tape.

This project took me approximately two late night hours (no rest for the wicked or for working mothers either), one hour of which 1 year old Portia was awake.

Wednesday, October 31, 2007

Chocolate Tart, Three Ways

I have, as of recently been experimenting with baking chocolate tarts. The first recipe I used was from the back of the Bellwether Farms creme fraiche wrapper.


Chocolate Tart
½ cup milk
7 ounces finely chopped bittersweet chocolate
1 large egg yolk
7.5 ounces Bellwether Farms crème fraîche

Lightly whip egg yolk with the crème fraîche and set aside. Bring milk to a boil, stirring continuously. Turn off heat and add chocolate to milk. Stir mixture until chocolate is completely melted. Slowly add egg and crème fraîche mixture to chocolate mixture and stir until thoroughly mixed. Place chocolate mix in 9-inch pastry shell and place in preheated oven at 325° oven for 25 minutes.Remove tart from oven and cool to room temperature. Chill in refrigerator for at least one hour before serving.

The second recipe was a pear and chocolate ganache tart.
Chocolate Pear Chocolate Tart
For the crust- 150 g flour- 20 g unsweetened cocoa powder- 85 g butter- 85 g sugar- a splash of milkFor the pears- 3 large ripe pears- 100 g sugarFor the ganache- 100 ml crème fleurette (whipping cream)- 150 g dark chocolate- 2 egg yolks- 40 g butter

Start out by making the chocolate crust. This is a twist on my mom's no-fail "pâte sablée", a gift of a recipe for which my gratitude shall shine eternally. In a food processor, mix the flour, the cocoa powder and the sugar. Add the butter, cut up in small pieces. Mix until you get coarse sand. Add a splash of milk and mix again. Pour the sandy dough into a pie pan (ideally non-stick with a removable bottom, otherwise butter the pan first), and use the heels of your hands and your fingers to spread and press the dough until it lines the whole pan.

Preheat the oven to 220°C (430°F). Cut out a circle of parchment paper to the size of your pie pan, put it on top of the dough, and spread baking marbles or dry beans over it. This is to prevent the crust from rising. Put the dough in the oven to bake for about 20 minutes, until it's cooked. It is a little hard to tell as you have baking marbles all over it, so you're just going to have to trust your guarding angel. Let cool, then remove the marbles and the parchment paper.

Prepare the pears : peel them, cut them into quarters and core them. Put them in a large saucepan, cover with water, sprinkle the sugar and bring to a slow boil. Cook for ten minutes, until the pears look translucent. Drain thoroughly.
Then comes my very favorite step, making the ganache filling. In a medium bowl, break up the chocolate in very small pieces. Set the egg yolks aside in a separate bowl, and dice up the butter. In a small saucepan, heat up the whipping cream until small bubbles start to form. Remove from heat. Add in the pieces of chocolate and stir with a fork until melted. Add in the yolks, and stir again thoroughly. Add the butter, mixing it in with the fork until no lumps remain. Marvel at the luscious chocolate cream you have created.

Assemble the tart : pour the ganache on the pie crust, and arrange the pear pieces on top. Carefully put the tart in the refrigerator for the ganache to firm up, a couple of hours should suffice. Take the tart out fifteen minutes before serving.

The third recipe was a caramel-chocolate tart that was adapted from the Gramercy Tavern's pastry chef, Claudia Fleming.
Chocolate Tart Dough: 1/2 cup unsalted butter (1 stick), at room temperature 1/2 cup plus 1 tablespoon confectioners' sugar 1/4 cup unsweetened cocoa 1 large egg yolk 3/4 teaspoon vanilla extract 1 1/4 cups all-purpose flour
Caramel Filling: 1/2 cup water 2 cups sugar 1/4 cup light corn syrup 1/2 cup (1 stick) unsalted butter 1/2 cup heavy cream 2 tablespoons creme fraiche

Chocolate Glaze: 1/2 cup heavy cream 3 1/2 ounces extra-bittersweet chocolate, chopped A pinch fine sea salt, such as fleur de sel

To prepare the tart dough, in the bowl of an electric mixer fitted with the paddle attachment, cream the butter and confectioners' sugar until combined, about 1 minute. Add the cocoa and beat until incorporated. Add the egg yolk and vanilla and beat until smooth. Sift in the flour and beat on low speed until just combined. Scrape the dough onto a sheet of plastic wrap and form it into a disk. Wrap and chill until firm, about 1 hour, or up to 3 days. Preheat oven to 325 degrees F. On a lightly floured surface, roll the tart dough 3/16-inch thick. Using a 2 1/2-inch round cutter, cut out 24 rounds of dough and press them into mini-muffin tins or 2 dozen 2-inch tart pans, trimming away any excess dough; prick the dough all over with a fork. Chill the tart shells for 20 minutes. Line the tart shells with foil and fill with dried beans, rice, or pie weights.

Bake for 15 minutes. Remove foil and weights and bake for 5 to 10 minutes longer or until the pastry looks dry and set. Transfer to a wire rack to cool. Remove cooled shells from tart pans and transfer to a plate.

To prepare the filling, place the water in a large saucepan. Add the sugar and corn syrup and cook the mixture over medium-high heat, swirling the pan occasionally, until you have a dark amber caramel, about 10 minutes. Carefully whisk in the butter, cream, and creme fraiche (the mixture will hiss and bubble up so stand back), whisking until smooth. (The caramel can be made up to 5 days ahead and refrigerated). Divide the caramel among the tart shells while still warm (or reheat the caramel in the microwave or over low heat until it is pourable) and let sit until the caramel is set, at least 20 minutes.

To make the glaze, in a saucepan, bring the cream to a boil. Place the chocolate in a bowl. Pour the hot cream over the chocolate, add a pinch of sea salt, and let sit for 2 minutes, then whisk until smooth. Pour some of the glaze over each of the tarts while it is still warm. Let the glaze set at room temperature for at least 2 hours before serving.


Of the three tarts, the first was the best. However, the tart shell from the caramel chocolate tart was probably the best tasting shell, and very easy to make in the Kitchen Aid. But, unfortunately the tart itself tasted like a candy bar, I think, which was disappointing as it took all day to make. There was way too much caramel, but this may have been my fault for two reasons, first I adapted the recipe from small tartlets to one large tart, and second, I am just not all that fond of caramel.

But even my husband, the caramel lover felt that there was too much caramel. I felt particularly sorry for our guests, one of whom said "Wow, this is great, I think that I am going to throw up later." Definitely not the reaction I was hoping for.